To fix a broken laptop hinge, you need to replace the hinge assembly with a new one. A broken laptop hinge can be a frustrating problem that hinders your ability to use your laptop properly.
Whether caused by wear and tear or accidental damage, a broken hinge can lead to a wobbly screen or even prevent it from staying open. Fortunately, fixing a broken laptop hinge is a straightforward process that can be done with a few simple steps.
We will guide you through the process of replacing a broken laptop hinge so that you can restore the functionality of your device. By following these steps, you can save money on professional repairs and have your laptop back in working order in no time.
Common Issues With Laptop Hinges
One of the most common issues that laptop users face is a broken hinge. The hinge plays a crucial role in connecting the base and the lid of the laptop, allowing it to open and close smoothly. However, due to regular wear and tear or mishandling, laptop hinges can become loose, stiff, or make grinding noises. In this section, we will discuss the three common issues that you may encounter with your laptop hinges and how to fix them.
Loose or wobbly hinge
A loose or wobbly hinge is a common problem that laptop users often experience. This issue can make it difficult to open or close the laptop lid securely. If you notice that the hinge is loose, it is important to address this issue promptly to prevent any further damage.
To fix a loose hinge, you can follow these steps:
- Start by removing the laptop battery and power adapter to ensure that the device is completely powered off.
- Next, locate the screws that secure the hinge to the laptop base.
- Tighten these screws using a small screwdriver, making sure not to overtighten them.
- If the screws are already tight, you may need to replace them with slightly longer ones that provide a better grip on the hinge.
- Once you have tightened the screws or replaced them, reassemble the laptop and check if the hinge is still loose. If the problem persists, you may need to consult a professional technician for further assistance.
Stiff or difficult movement
If you find that the laptop hinge is stiff or difficult to move, it can be quite frustrating. This issue can make it challenging to open or close your laptop smoothly, affecting your overall user experience.
To fix a stiff hinge, you can try the following solutions:
- Start by cleaning the hinge area using a soft cloth or compressed air to remove any dust, dirt, or debris that may be causing the stiffness.
- Apply a small amount of lubricant specifically designed for hinges onto the affected area.
- Gently move the hinge back and forth several times to distribute the lubricant evenly.
- If the stiffness persists, you may need to disassemble the hinge mechanism and clean it thoroughly before reassembling it. It is advisable to seek professional help for this task to avoid any further damage.
Hinge making grinding or creaking noise
If your laptop hinge is making a grinding or creaking noise when you open or close it, it can be quite unsettling. This issue can create unnecessary distractions and indicate potential damage to the hinge mechanism.
To fix a hinge that is making grinding or creaking noises, you can try the following steps:
- Inspect the hinge carefully for any visible signs of damage or misalignment.
- If you notice any loose screws, tighten them using a small screwdriver.
- If the noise persists, you may need to apply a small amount of lubricant specifically designed for hinges to reduce friction.
- Gently move the hinge back and forth several times to distribute the lubricant evenly.
- If the problem continues, it is recommended to seek professional help from a qualified technician who can assess the situation and provide an appropriate solution.
By addressing these common issues with laptop hinges promptly, you can ensure the longevity and smooth functionality of your laptop. Remember to handle your device with care and follow the manufacturer’s guidelines to minimize the risk of hinge damage. If you are unsure or uncomfortable performing any of the suggested fixes, it is always best to seek professional assistance to avoid causing further damage.
Signs Of A Broken Hinge
A broken laptop hinge can be a frustrating issue, making it difficult to open and close your laptop properly. If you suspect your laptop hinge is broken, here are some common signs to look out for:
Laptop Screen Not Staying in Position
One of the most noticeable signs of a broken hinge is when your laptop screen refuses to stay in position. Instead of remaining at the desired angle, the screen might fall backward or shut abruptly. This can be problematic, especially if you frequently use your laptop for work or entertainment purposes. Constantly readjusting the screen position not only affects your user experience but also puts strain on the hinge, potentially worsening the problem.
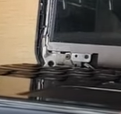
Part of the Hinge Visibly Cracked or Broken
Another clear indication of a broken hinge is if you notice any visible cracks or damage on the hinge itself. This can happen due to various reasons, such as mishandling, excessive pressure, or wear and tear over time. Cracks or breaks in the hinge can compromise its structural integrity, leading to further damage if not addressed promptly. It’s important to identify this sign early on to prevent the issue from escalating and potentially causing irreversible damage to your laptop.
Laptop Lid Not Closing Properly
If you’ve been struggling to close your laptop lid properly, it could be a sign of a broken hinge. A functioning hinge allows the laptop lid to smoothly close and stay securely shut. However, if the hinge is damaged, you may encounter difficulties in aligning the lid correctly or experience it popping open unexpectedly. This not only poses a risk to your laptop’s internal components but also leaves it vulnerable to dust, debris, and potential scratches.
If you notice any of these signs, it’s essential to address the issue promptly to prevent further damage and ensure the longevity of your laptop. In the next section, we will explore how to fix a broken laptop hinge and restore your laptop to its optimal working condition.
Checking For Additional Damage
Once you have identified that your laptop hinge is broken, it is important to check for any additional damage that may have occurred. This step is crucial in ensuring that the repair process is comprehensive and that all issues are addressed. By carefully inspecting the laptop casing for cracks, ensuring the hinge screws are tight, and verifying if other parts connected to the hinge are damaged, you can prevent any further problems down the line. Let’s dive into each aspect of checking for additional damage.
Inspecting the Laptop Casing for Cracks
Start by carefully examining the laptop casing for any cracks or fractures. Cracks in the casing can weaken the overall structure of the laptop and potentially lead to further damage. Take a close look at all sides of the casing, paying special attention to areas near the hinge. If you spot any cracks, it is important to address them promptly to prevent the issue from worsening.
Ensuring the Hinge Screws are Tight
Next, check the hinge screws to ensure they are tight. Loose screws can cause the hinge to function improperly and may result in further damage over time. To do this, use a small screwdriver to gently tighten any loose screws you may find. Be careful not to overtighten them, as this can lead to stripped screws or other complications. It’s also a good idea to check surrounding screws and components to ensure they are secure as well.
Verifying if Other Parts Connected to the Hinge are Damaged
The last step in checking for additional damage is to verify if other parts connected to the hinge are damaged. These parts may include the display panel, keyboard, or any other components linked to the hinge mechanism. Carefully examine each of these parts for signs of visible damage or malfunction. Pay close attention to any unusual movements, misalignments, or functionality issues. If you notice any problems, it is best to consult a professional for repair or replacement.
By thoroughly inspecting the laptop casing for cracks, ensuring the hinge screws are tight, and verifying if other parts connected to the hinge are damaged, you can determine the extent of the damage and take appropriate action. Remember, addressing additional damage promptly will not only prevent further issues but also ensure your laptop functions optimally in the long run.
Tightening The Hinge Screws
Gathering the necessary tools
Before you begin tightening the hinge screws on your broken laptop, it’s important to gather the necessary tools. By having the right equipment on hand, you’ll be able to complete the task efficiently and effectively. Here are a few essential tools you’ll need:
- A small Phillips head screwdriver
- A clean cloth or towel
- A soft surface to work on, such as a table or desk
Locating the hinge screws on the laptop
Now that you have all the tools you need, the next step is to locate the hinge screws on your laptop. These screws are typically located on the backside of the laptop screen, near the hinge area. However, the exact placement can vary depending on the make and model of your laptop.
To find the hinge screws, carefully flip your laptop screen open and examine the area where the screen connects to the base. You may need to use a flashlight to get a better view. Look for small screws that are securing the hinge mechanism in place. They are usually Phillips head screws, although some laptops may use different types.
Using a screwdriver to tighten the screws
Once you have located the hinge screws, it’s time to start tightening them. Grab your small Phillips head screwdriver and position it securely on the head of the screw. Make sure you have a firm grip on the screwdriver to prevent any slippage.
Using steady pressure, carefully turn the screwdriver clockwise to tighten the hinge screws. Start with the screws at the top and work your way down. Be cautious not to overtighten, as this could potentially cause damage to the screws or the laptop.
After tightening each screw, check the hinge movement to assess if it feels more secure. If there is still some looseness or wobbling, continue tightening the screws until the desired tightness is achieved.
Remember to be gentle but firm when tightening the hinge screws. If you encounter any resistance or difficulty, stop immediately and re-evaluate your approach. Applying excessive force can lead to further damage.
By following these steps and tightening the hinge screws on your broken laptop, you can help restore stability and functionality to your device. If the hinge problem persists or worsens, it may be best to consult a professional technician who specializes in laptop repairs.
Lubricating The Hinge
Choosing the appropriate lubricant
When it comes to fixing a broken laptop hinge, one crucial step is lubricating the hinge. Choosing the appropriate lubricant is essential to ensure smooth movement and prevent further damage. It is recommended to use a silicon-based lubricant for laptop hinges, as it offers excellent lubrication without attracting dust or dirt. Silicon lubricants are also non-corrosive, making them safe to use on delicate laptop components. Avoid using any oil-based lubricants, as they can cause sticky residue buildup and attract more debris.
Applying the lubricant to the hinge
Now that you’ve selected the right lubricant, it’s time to apply it to the hinge. Begin by locating the hinges on your laptop. Use a small brush or cotton swab to apply a thin layer of silicon lubricant directly onto the hinges. Be sure to cover both the top and bottom hinge, as well as any other moving parts within the hinge mechanism. Remember to apply the lubricant sparingly – a little goes a long way. Make sure not to apply any lubricant to the laptop screen or other sensitive areas.
If you’re unsure about the location of the hinges or how to access them, consult your laptop manufacturer’s documentation or perform a quick online search for your laptop’s make and model, followed by “hinge location.”
Opening and closing the laptop to distribute the lubricant
Once you’ve applied the lubricant, it’s essential to distribute it evenly throughout the hinge mechanism. To do this, gently open and close your laptop several times. This will allow the lubricant to work its way into the tight spaces of the hinge mechanism, offering optimal lubrication. As you open and close the laptop, you may notice smoother movement and reduced strain on the hinge.
If you encounter any resistance during this step, stop immediately and reapply a small amount of lubricant. Be cautious not to over-apply the lubricant, as it may cause excessive buildup or dripping. Always remember to wipe away any excess lubricant to prevent it from spreading onto other laptop components or surfaces.
By following these steps and choosing the appropriate lubricant, you can effectively restore the functionality of a broken laptop hinge.
Replacing The Hinge Cover
One of the most common issues with a broken laptop hinge is a damaged or cracked hinge cover. The hinge cover not only provides a protective covering for the hinge mechanism but also adds an aesthetic appeal to the laptop. If you’re experiencing problems with your laptop hinge cover, don’t worry – replacing it can be a straightforward and relatively simple task. In this guide, we’ll walk you through the process of removing the old hinge cover, installing the new one, and testing the laptop hinge movement.
Removing the old hinge cover
The first step in replacing the hinge cover is to remove the old one. Follow these steps:
- Power off your laptop and remove any external cables or devices that may be connected to it.
- Take a small flathead screwdriver and gently insert it into the seam between the hinge cover and the laptop base. Be careful not to apply too much pressure to avoid causing any additional damage.
- Once inserted, carefully pry up the old hinge cover, working your way around the edges until it is completely detached from the laptop base.
- Once removed, set the old hinge cover aside.
Installing the new hinge cover
Now that you have successfully removed the old hinge cover, it’s time to install the new one. Follow these steps:
- Take the new hinge cover and align it with the hinge mechanism on the laptop base.
- Gently press down on the hinge cover, starting from the center and working your way outwards. Ensure that the hinge cover is securely attached to the laptop base.
- Apply gentle pressure to the edges of the hinge cover to ensure it is properly seated.
- Check for any gaps or misalignment and make any necessary adjustments.
Testing the laptop hinge movement
After replacing the hinge cover, it’s crucial to test the laptop hinge movement to ensure everything is functioning properly. Follow these steps:
- Open and close the laptop carefully to check if the hinge movement is smooth and without any resistance.
- Make sure that the laptop screen remains in the desired position without any wobbling or instability.
- If you notice any issues with the hinge movement, double-check the alignment of the hinge cover and repeat the installation steps if necessary.
- Once you are satisfied with the hinge movement, power on your laptop and ensure all other components are functioning as expected.
By following these steps, you can easily replace a broken hinge cover on your laptop. Taking the time and effort to fix the hinge cover not only enhances the appearance of your laptop but also prolongs its lifespan.
Repairing A Broken Hinge With Epoxy
Is your laptop hinge causing you trouble, making it impossible to open or close your laptop without feeling like you’re about to snap it in half? Don’t worry, there’s a solution! Repairing a broken hinge with epoxy is a cost-effective and DIY-friendly option that can save you from shelling out big bucks for a professional repair. In this guide, we’ll walk you through the steps of repairing a broken hinge with epoxy, ensuring your laptop is back in working order in no time.
Preparing the Laptop and Epoxy
Before diving into the epoxy repair process, it’s crucial to prepare your laptop and epoxy for the task at hand. Follow these steps:
- Disconnect and turn off the laptop: Safely shut down your laptop and unplug it from any power source. It’s important to ensure no electricity is flowing through the laptop during the repair process to avoid any accidents.
- Remove the laptop’s battery: Locate the battery release latch or screws on the bottom of your laptop and carefully remove the battery. This step will give you better access to the hinge area.
- Clean the broken hinge area: Use a soft cloth or alcohol wipe to clean the broken hinge area, removing any dirt, dust, or debris that could hinder the epoxy’s effectiveness. It’s crucial to have a clean surface for the epoxy to adhere properly.
- Gather the epoxy: Purchase a high-quality epoxy adhesive suitable for repairing plastic or metal, depending on the material of your laptop hinge. Ensure you follow the manufacturer’s instructions and safety precautions while handling the epoxy.
Applying the Epoxy to the Broken Hinge
Now that your laptop and epoxy are prepared, it’s time to apply the epoxy to the broken hinge. Here’s how:
- Mix the epoxy: Following the manufacturer’s instructions, mix the epoxy adhesive thoroughly. It’s crucial to achieve a well-blended mixture for optimal bonding.
- Apply the epoxy to the broken hinge: Using a small brush or toothpick, carefully apply a thin layer of epoxy adhesive to the broken hinge area. Ensure you cover the entire broken surface, applying a uniform layer to promote a strong bond.
- Align and support the hinge: Gently align the broken hinge back into its original position, ensuring it fits perfectly. Then, support the hinge with tape, clamps, or other tools to keep it in place while the epoxy cures. Double-check that the laptop is closed during this process to avoid accidentally gluing the laptop shut.
Allowing the Epoxy to Cure and Testing the Hinge
After applying the epoxy, it’s crucial to allow it sufficient time to cure before testing the hinge. Follow these steps:
- Refer to the epoxy’s curing time: Every epoxy adhesive has a specific curing time mentioned in the manufacturer’s instructions. Ensure you give the epoxy enough time to fully cure, providing a strong bond.
- Remove the support: Once the curing time has passed, carefully remove the supporting tools or clamps from the hinge area. Be cautious not to apply excessive force that could damage the repair.
- Test the hinge: Finally, open and close your laptop multiple times to test the repaired hinge. Check for smooth movement, as well as any signs of residual weakness or crackling sounds. If everything feels sturdy and functions well, congratulations! You’ve successfully repaired your broken hinge with epoxy.
By repairing a broken hinge with epoxy, you’ve not only saved yourself from the unnecessary expenses of professional repairs but also empowered yourself to fix a common laptop issue with ease. Follow these steps carefully, and your laptop will be back to its former glory in no time!
Removing And Replacing The Entire Hinge Assembly
Is your laptop hinge causing you trouble, making it difficult to open and close your laptop? Don’t worry, we’ve got you covered! In this guide, we’ll walk you through the process of removing and replacing the entire hinge assembly of your laptop, getting it back to working condition in no time.
Disassembling the laptop hinge
The first step in fixing a broken laptop hinge is to disassemble the existing hinge. To do this, follow these simple steps:
- Power off your laptop and unplug it from any power sources.
- Place a soft cloth or mat on a flat surface to protect your laptop.
- Open your laptop and carefully remove any screws securing the bezel around the screen.
- Gently pry off the bezel using a plastic opening tool or your fingers. Be cautious not to apply too much force to avoid damaging the screen.
- Locate the broken hinge assembly and identify any screws or connections holding it in place.
- Using a screwdriver, carefully remove the screws securing the old hinge assembly.
- Disconnect any cables or wires attached to the hinge.
- Once all screws and connections have been removed, gently lift and remove the old hinge assembly from your laptop.
- Set aside the old hinge assembly for disposal.
Ordering a replacement hinge assembly
With the old hinge assembly successfully removed, it’s time to order a replacement. Follow these steps to ensure you’re getting the correct hinge assembly for your laptop:
- Identify the make and model of your laptop. This information is usually found on the bottom of your laptop or in the system information settings.
- Use a trusted online retailer or the manufacturer’s website to find the exact replacement hinge assembly for your laptop model.
- Make sure to double-check the compatibility of the replacement hinge assembly with your laptop model.
- Place your order and provide the necessary shipping information.
- Wait for the replacement hinge assembly to arrive at your doorstep.
Installing the new hinge assembly and testing functionality
Now that you have the replacement hinge assembly, it’s time to install it and ensure everything is working properly. Follow these steps:
- Position the new hinge assembly in place and carefully reconnect any cables or wires.
- Secure the new hinge assembly with the screws you removed earlier.
- Reattach the bezel around the screen by snapping it back into place or using the screws.
- Power on your laptop and test the functionality of the new hinge assembly by opening and closing the laptop.
- Ensure the hinge operates smoothly without any stiffness or resistance.
- If everything looks and feels good, congrats! You have successfully fixed your broken laptop hinge. If not, double-check your installation steps and consult the manufacturer’s documentation or seek professional assistance.
By following these steps, you’ll be able to remove, replace, and install a new hinge assembly on your laptop, restoring its functionality and getting back to work or entertainment.
Identifying Complex Hinge Repair Cases
When it comes to fixing a broken laptop hinge, there are times when the repair process can be quite complex. These complex cases often involve multiple broken parts or extensive damage, lack of technical expertise or equipment, and considerations regarding warranty or insurance coverage. It is important to identify these situations to ensure the right approach is taken to repair the laptop hinge effectively.
MULTIPLE BROKEN PARTS OR EXTENSIVE DAMAGE
In some instances, a broken laptop hinge may involve not just one but multiple broken parts or extensive damage. This can happen due to accidental drops, mishandling, or wear and tear over time. It is crucial to assess the extent of the damage before attempting any repairs.
If you notice that the hinge is not the only component that needs fixing, such as a cracked screen or damaged casing, it’s recommended to gather all the necessary replacement parts before proceeding. This will ensure a smoother repair process and prevent any disruptions caused by missing or incorrect components.
LACK OF TECHNICAL EXPERTISE OR EQUIPMENT
Repairing a laptop hinge requires technical expertise and the right set of tools. If you lack the necessary skills or equipment, it’s best to seek professional help to avoid causing further damage to your laptop.
Attempting a complex hinge repair without proper knowledge or tools may result in irreversible damage to other components or the hinge itself. By consulting an experienced technician, you can be confident that the repair will be handled correctly and efficiently.
WARRANTY OR INSURANCE COVERAGE CONSIDERATIONS
Before diving into the repair process, it’s essential to check if your laptop is still under warranty or if you have insurance coverage that includes hinge repair. In such cases, reaching out to the manufacturer or your insurance provider should be the first step.
Warranties and insurance policies often have specific terms and conditions regarding repairs and replacements. Depending on the coverage, you may be eligible for a free or discounted repair. It’s essential to review the details and follow the necessary steps outlined by the warranty or insurance provider.
If your laptop is no longer under warranty or covered by insurance, you can explore other repair options, such as independent repair shops or DIY solutions.
In conclusion, complex hinge repair cases require careful consideration and proper identification. Whether it involves multiple broken parts, lack of technical expertise or equipment, or warranty and insurance coverage considerations, it’s crucial to approach the repair process with caution and seek expert assistance when needed.
Finding A Reputable Laptop Repair Service
If your laptop hinge is broken and needs to be fixed, it’s crucial to find a reputable laptop repair service. With so many options available, it can be overwhelming to choose the right one. However, by following the steps below, you can ensure that you select a reliable and trustworthy repair service that will restore your laptop to its optimal functionality.
Researching and Reading Reviews
One of the first steps in finding a reputable laptop repair service is to conduct thorough research. Begin by searching for laptop repair services in your local area. Take note of the businesses that have positive online reviews and high ratings. These reviews will provide you with valuable insights into the quality of their service, professionalism, and customer satisfaction.
Once you have compiled a list of potential repair services, it’s time to dive deeper into the reviews. Look for specific details in the reviews that highlight the expertise of the technicians, the effectiveness of the repairs, and the overall experience of the customers.
Additionally, consider reaching out to friends, family, or colleagues who have had their laptops repaired. They may have valuable recommendations based on their personal experiences. Word-of-mouth referrals can often lead you to trustworthy and reliable repair services.
Obtaining Price Quotes and Warranties
After narrowing down your options based on the research, it’s time to obtain price quotes. Contact each repair service and provide them with the details of your laptop hinge issue. Ask for a comprehensive quote that includes the cost of the repair as well as any additional fees. This will allow you to compare prices and choose a repair service that offers reasonable rates within your budget.
Furthermore, inquire about the warranties offered by each repair service. A reputable repair service should provide a warranty on their repair work. This will give you peace of mind, knowing that if the hinge issue recurs or if any new problems arise, the repair will be covered by the warranty.
Discussing the Repair Process and Expected Timelines
Lastly, before making your final decision, it’s important to have a clear understanding of the repair process as well as the expected timelines. Reach out to the repair service and discuss the steps involved in repairing the broken hinge. Ask questions about the expertise of the technicians, the quality of the replacement parts, and the time it will take to complete the repair.
This step is crucial to ensure that your laptop is in good hands and that the repair will be carried out effectively and efficiently. Understanding the repair process will also help you set realistic expectations regarding the completion time, allowing you to make necessary arrangements in case you need a temporary replacement laptop.
In conclusion, finding a reputable laptop repair service requires careful research, reading online reviews, obtaining price quotes with warranties, and discussing the repair process and expected timelines. By following these steps, you can confidently choose a repair service that will fix your broken laptop hinge and ensure its long-term functionality.
Frequently Asked Questions For How To Fix A Broken Laptop Hinge
How Much Does It Cost To Fix A Broken Laptop Hinge?
The cost to fix a broken laptop hinge can vary but typically ranges between $50-$200.
Are Laptop Hinges Replaceable?
Yes, laptop hinges can be replaced.
Can Broken Hinges Be Repaired?
Yes, broken hinges can typically be repaired by a professional technician using appropriate tools and techniques.
Conclusion
Fixing a broken laptop hinge may seem like a daunting task, but with the right tools and techniques, it can be a manageable DIY project. Remember to gather all the necessary materials, take your time, and follow step-by-step instructions to ensure a successful repair.
Disassembling the laptop and replacing the hinge may require some patience and technical know-how, but the satisfaction of having a fully functional laptop is worth the effort. Additionally, regular maintenance and being gentle with your laptop can help prevent hinge damage in the future.
By following these tips and tricks, you can save time and money by repairing a broken laptop hinge on your own. So don’t let a broken hinge hold you back – take the necessary steps to fix it and get your laptop back in working order.
Happy repairing!