To connect a laptop to a TV without HDMI, you can use a VGA (D-Sub) cable. This cable connects the VGA port on your laptop to the VGA port on your TV, allowing you to mirror your laptop’s screen on your TV.

With this method, you can enjoy your laptop’s content on a larger screen without the need for an HDMI cable.
Understanding Compatibility Between Laptop And TV
Connecting a laptop to a TV without an HDMI cable is a convenient and cost-effective solution for extending your viewing experience. However, before attempting to establish a connection, it is crucial to understand the compatibility between your laptop and TV. This involves checking the laptop ports and TV inputs, as well as ensuring compatibility between the two devices.
Checking Laptop Ports And Tv Inputs
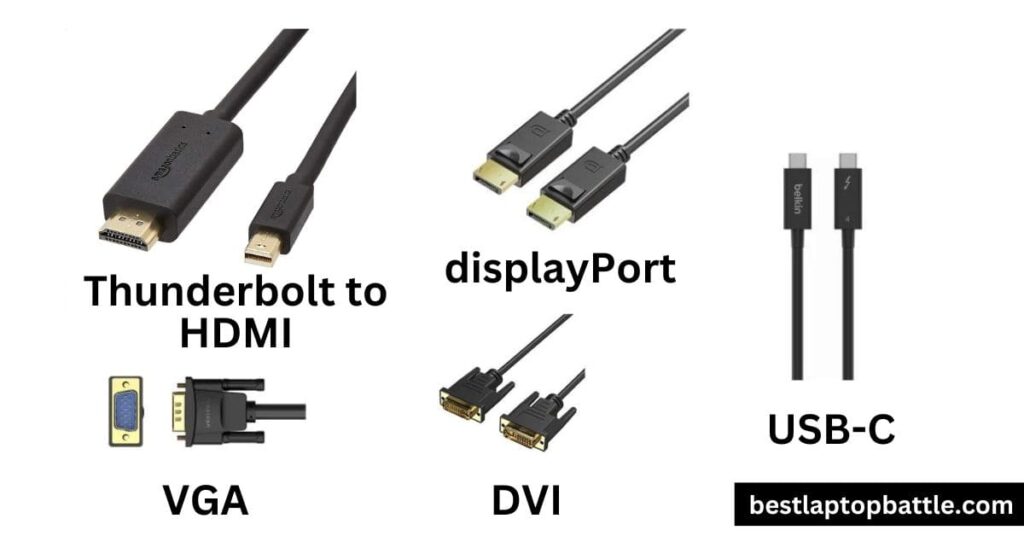
Begin by examining the ports available on your laptop. While HDMI is not an option, there are alternative ports such as VGA, DVI, or DisplayPort that may be present. Take note of the available ports and assess if any correspond with the inputs on your TV.
If your TV has a VGA input, you can utilize a VGA cable to connect your laptop. For DVI or DisplayPort, you may need to use additional adapters or converters to establish a connection. Consult the user manuals of your laptop and TV to determine the compatible ports and corresponding cables or adapters required.
Checking Laptop And TV Compatibility
Aside from the physical connections, compatibility between your laptop and TV is crucial for a successful connection. Different laptop models and TV brands may have varying compatibility requirements. Therefore, it is essential to consider the following factors:
- Resolution: Ensure that your laptop’s resolution is supported by your TV. If the resolution does not match, you may experience display issues or the inability to connect.
- Refresh Rate: Verify that the refresh rate of your laptop and TV are compatible. Mismatched refresh rates can lead to a flickering or lagging display.
- Audio Output: Check if your laptop has a separate audio output port. If so, determine if your TV has compatible audio input options. This ensures that you can enjoy audio along with the visual content.
- Graphics Card: Confirm that your laptop’s graphics card can support the desired resolution and display settings on your TV. Insufficient graphics capabilities may result in poor image quality or limited display options.
By thoroughly assessing the compatibility between your laptop and TV, you can proceed with confidence when connecting them without HDMI. Remember to refer to the user manuals of both devices and utilize any necessary cables, adapters, or converters to establish a successful connection.
Different Methods For Connecting A Laptop To A TV
Connecting a laptop to a TV allows you to enjoy your favorite movies, videos, and presentations on a larger screen. While HDMI is the most common method for connecting the two devices, there are several alternative options available for laptops without an HDMI port. In this article, we’ll explore different methods for connecting a laptop to a TV without HDMI, including VGA cable, DVI cable, DisplayPort cable, Thunderbolt cable, USB-C cable, and wireless screen mirroring.
VGA Cable Connection
A VGA (Video Graphics Array) cable is an analog video cable that is commonly used to connect a laptop to a TV or monitor. It transmits video signals from the laptop’s VGA port to the VGA port on the TV. To connect your laptop to a TV using a VGA cable, follow these steps:
- Check if your laptop has a VGA port and your TV has a VGA input.
- Connect one end of the VGA cable to the VGA port on your laptop.
- Connect the other end of the VGA cable to the VGA input on your TV.
- Adjust the display settings on your laptop to extend or duplicate the screen to the TV.
- Enjoy your laptop’s content on the bigger TV screen.
DVI Cable Connection
A DVI (Digital Visual Interface) cable is a digital video cable that can be used to connect a laptop to a TV or monitor. It provides a higher quality video signal compared to a VGA cable. To connect your laptop to a TV using a DVI cable, follow these steps:
- Check if your laptop has a DVI port and your TV has a DVI input.
- Connect one end of the DVI cable to the DVI port on your laptop.
- Connect the other end of the DVI cable to the DVI input on your TV.
- Adjust the display settings on your laptop to extend or duplicate the screen to the TV.
- Enjoy your laptop’s content on the bigger TV screen.
DisplayPort Cable Connection
A DisplayPort cable is a digital video and audio cable that provides high-quality transmission for connecting a laptop to a TV or monitor. To connect your laptop to a TV using a DisplayPort cable, follow these steps:
- Check if your laptop has a DisplayPort and your TV has a DisplayPort input.
- Connect one end of the DisplayPort cable to the DisplayPort on your laptop.
- Connect the other end of the DisplayPort cable to the DisplayPort input on your TV.
- Adjust the display settings on your laptop to extend or duplicate the screen to the TV.
- Enjoy your laptop’s content on the bigger TV screen.
Thunderbolt Cable Connection
A Thunderbolt cable is a high-speed data and video cable that can be used to connect a laptop to a TV or monitor. It provides fast data transfer and supports multiple display connections. To connect your laptop to a TV using a Thunderbolt cable, follow these steps:
- Check if your laptop has a Thunderbolt port and your TV has a Thunderbolt input.
- Connect one end of the Thunderbolt cable to the Thunderbolt port on your laptop.
- Connect the other end of the Thunderbolt cable to the Thunderbolt input on your TV.
- Adjust the display settings on your laptop to extend or duplicate the screen to the TV.
- Enjoy your laptop’s content on the bigger TV screen.
USB-C Cable Connection
A USB-C cable is a versatile cable that can transmit both data and video signals. It is commonly used to connect a laptop to a TV or monitor. To connect your laptop to a TV using a USB-C cable, follow these steps:
- Check if your laptop has a USB-C port and your TV has a USB-C input.
- Connect one end of the USB-C cable to the USB-C port on your laptop.
- Connect the other end of the USB-C cable to the USB-C input on your TV.
- Adjust the display settings on your laptop to extend or duplicate the screen to the TV.
- Enjoy your laptop’s content on the bigger TV screen.
Wireless Screen Mirroring
Wireless screen mirroring allows you to mirror your laptop’s screen on a TV wirelessly. It provides convenience and flexibility, eliminating the need for cables. To connect your laptop to a TV using wireless screen mirroring, follow these steps:
- Ensure that both your laptop and TV support wireless screen mirroring.
- Enable screen mirroring on your laptop.
- Enable screen mirroring on your TV.
- Pair your laptop and TV using the provided instructions.
- Enjoy real-time mirroring of your laptop’s screen on the TV.
Connecting Laptop To Tv Using DVI Cable
Step 1: Check Laptop and TV Ports Before you begin connecting your laptop to the TV using a DVI cable, it’s important to check the ports on both your laptop and TV. Most laptops have a DVI-I or DVI-D port, while TVs usually have a DVI-D port. It’s crucial to make sure both devices have compatible ports to ensure a successful connection.
Step 2: Connect the DVI Cable Once you have confirmed that your laptop and TV have compatible ports, it’s time to connect the DVI cable. Follow these steps:
- Turn off both your laptop and TV.
- Locate the DVI port on your laptop and insert one end of the DVI cable into it.
- Locate the DVI port on your TV and insert the other end of the DVI cable into it.
Note: If your laptop or TV has screws near the DVI ports, make sure to tighten them to ensure a secure connection.
Step 3: Adjust Display Settings After connecting the DVI cable, you may need to adjust the display settings on your laptop to ensure the TV is recognized as a secondary display. Here’s how to do it:
- Turn on your laptop and TV.
- Right-click on your desktop and select “Display settings” or “Screen resolution” from the context menu.
- In the display settings window, you should see options for multiple displays. Select the option that enables the TV as a secondary display.
Note: The specific steps for adjusting display settings may vary depending on your operating system. Make sure to refer to the user manual or help documentation for your laptop if you encounter any difficulties.
With these simple steps, you can connect your laptop to a TV using a DVI cable. Enjoy watching your favorite movies, videos, or presentations on a larger screen without the need for an HDMI cable.
Connecting Laptop To TV Using VGA Cable
If you want to connect your laptop to a TV without an HDMI port, using a VGA cable is a great option. VGA (Video Graphics Array) is a standard analog connection that transmits video signals from your laptop to the TV. In this article, we will guide you through the steps of connecting your laptop to your TV using a VGA cable.
Step 1: Check Laptop And TV Ports
Before you begin, ensure that both your laptop and TV have VGA ports. These ports are usually blue in color and are found on the sides or backs of the devices. Once you have confirmed that your devices have VGA ports, you can proceed to the next step.
Step 2: Connect The VGA Cable
Start by powering off both your laptop and TV. Then, take one end of the VGA cable and insert it into the VGA port of your laptop. Make sure to align the pins on the cable with the holes in the port, and tighten the screws on the cable for a secure connection. Next, take the other end of the VGA cable and insert it into the VGA port of your TV. Again, tighten the screws to ensure a stable connection.
Step 3: Adjust Display Settings
Once the VGA cable is connected, power on your laptop and TV. To display your laptop’s screen on the TV, you may need to adjust your display settings. On your laptop, navigate to the display settings in the control panel. Look for the option to extend or duplicate the display, and select the TV as the secondary monitor. Save the changes, and your laptop’s screen should now be mirrored on the TV.
Remember, the quality of the display may vary depending on various factors such as the resolution settings of your laptop and the capabilities of your TV. It is recommended to experiment with different display settings to find the best visual output.
With these simple steps, you can connect your laptop to a TV using a VGA cable. Whether you want to watch your favorite movies on a larger screen or give a presentation, this method provides a convenient solution when HDMI is not available. Enjoy the enhanced viewing experience!
Connecting Laptop To TV Using USB-C Cable
Step 1: Check Laptop And Tv Ports
Before connecting your laptop to your TV using a USB-C cable, it’s important to first check the ports on both devices. Look for a USB-C port on your laptop and an HDMI port on your TV. If your laptop doesn’t have a USB-C port, you may need to use an adapter to connect the cable.
Step 2: Connect The USB-C Cable
Once you have verified that both your laptop and TV have the necessary ports, you can proceed to connect them using the USB-C cable. Start by plugging one end of the cable into the USB-C port on your laptop. Then, take the other end of the cable and insert it into the HDMI port on your TV.
Step 3: Adjust Display Settings
After connecting the USB-C cable between your laptop and TV, you may need to adjust the display settings to ensure that the content from your laptop is properly mirrored or extended onto the TV screen. This can typically be done by accessing the display settings on your laptop and selecting the appropriate display mode.
By following these simple steps, you can easily connect your laptop to your TV without an HDMI cable using a USB-C connection. This method provides a convenient way to enjoy your laptop’s content on a larger screen, whether you want to watch movies, share presentations, or play games.
Connecting Laptop To TV Using DisplayPort Cable
Step 1: Check Laptop And TV Ports
Before connecting your laptop to the TV using a DisplayPort cable, it’s important to check the ports on both your laptop and the TV. Make sure your laptop has a DisplayPort output, and your TV has a Display Port input.
If your laptop doesn’t have a DisplayPort output, you may need to use an adapter or find an alternative method to connect your laptop to the TV.
Step 2: Connect The Displayport Cable
Once you’ve confirmed that your laptop and TV have the necessary ports, you can proceed to connect them using a DisplayPort cable.
Start by inserting one end of the DisplayPort cable into the DisplayPort output on your laptop. Make sure it’s firmly connected.
Next, insert the other end of the DisplayPort cable into the DisplayPort input on your TV. Ensure that it’s securely plugged in.
Step 3: Adjust Display Settings
After connecting the DisplayPort cable, you may need to adjust the display settings on your laptop and TV to ensure proper functionality.
On your laptop, go to the display settings and select the option to extend or duplicate your display. This will allow you to see your laptop screen on the TV.
On your TV, navigate to the input selection and choose the DisplayPort input where you connected the cable.
Once you’ve adjusted the display settings on both your laptop and TV, you should be able to see your laptop screen on the TV.
Connecting Laptop To TV Using Thunderbolt Cable
If you don’t have an HDMI cable to connect your laptop to your TV, don’t worry! There are other ways to achieve this connection. One popular method is to use a Thunderbolt cable, which allows you to transmit both video and audio signals from your laptop to your TV.
Step 1: Check Laptop And TV Ports
The first step in connecting your laptop to your TV using a Thunderbolt cable is to check the ports available on both devices. Most modern laptops have Thunderbolt ports, which are small and rectangular in shape. On the other hand, your TV might have a Thunderbolt input or a DisplayPort input, which is compatible with Thunderbolt cables.
| Laptop Ports | TV Ports |
|---|---|
| Thunderbolt Port | Thunderbolt Input/DisplayPort Input |
Step 2: Connect The Thunderbolt Cable
Once you have identified the compatible ports on both your laptop and TV, it’s time to connect them using the Thunderbolt cable. Make sure both devices are turned off before making the connection. Insert one end of the Thunderbolt cable into the Thunderbolt port on your laptop and the other end into the Thunderbolt input/DisplayPort input on your TV.
Step 3: Adjust Display Settings
After connecting your laptop to your TV using the Thunderbolt cable, you may need to adjust the display settings to ensure a seamless viewing experience. To do this, follow these steps:
- Turn on both your laptop and TV.
- On your laptop, go to the display settings by right-clicking on the desktop and selecting “Display settings” from the context menu.
- In the display settings, you should see available displays. Select the TV as the primary display to mirror your laptop screen onto the TV.
- Adjust the resolution and other display settings according to your preferences.
- Save the changes and enjoy your laptop screen on your TV!
With these simple steps, you can easily connect your laptop to your TV using a Thunderbolt cable. Whether you want to watch movies, play games, or give a presentation, this method provides a reliable connection between your devices without the need for an HDMI cable.
Connecting Laptop To TV Via Wireless Screen Mirroring
Step 1: Check Laptop And Tv Compatibility
Before you begin the process, ensure that both your laptop and TV support screen mirroring. Most modern laptops and smart TVs offer this feature, but it’s always good to double-check.
You can check your laptop’s compatibility by searching for “screen mirroring” or “wireless display” in your laptop’s settings. If your laptop supports screen mirroring, you will see an option to enable it.
As for the TV, search for the specific model of your smart TV and check if screen mirroring is supported. You can find this information in the TV’s user manual or by doing a quick online search.
Step 2: Enable Screen Mirroring On The Laptop And Tv
Once you’ve confirmed that both your laptop and TV support screen mirroring, the next step is to enable this feature on both devices.
On your laptop, go to the settings and look for the “screen mirroring” or “wireless display” option. Enable it to allow your laptop to connect to other devices wirelessly.
On your TV, find the screen mirroring option in the settings menu. Depending on the brand and model, this option may be called “Miracast,” “Screen Share,” or “AirPlay.” Enable it to allow your TV to receive the mirrored content from your laptop.
Step 3: Connect Laptop To TV Wirelessly
Now that both devices are ready, follow these steps to connect your laptop to your TV wirelessly:
- Make sure your laptop and TV are connected to the same Wi-Fi network.
- On your laptop, open the “screen mirroring” or “wireless display” settings and search for available devices.
- Select your TV from the list of available devices. It may take a few moments for your laptop to establish the connection.
- Once the connection is established, your laptop screen will be mirrored on your TV.
It’s worth noting that the screen mirroring process may differ slightly depending on your laptop’s operating system and TV brand. However, the general steps outlined above should guide you through the process.
By following these steps, you can connect your laptop to your TV wirelessly without the need for an HDMI cable. Enjoy your content on a larger screen and enhance your viewing experience!
Troubleshooting Common Issues
No Audio On Tv
If you encounter the situation where you have successfully connected your laptop to the TV without HDMI, but there is no audio coming from the TV speakers, don’t worry! There are a few things you can check and try to resolve this issue.
- First and foremost, make sure the volume on your laptop is turned up and not muted. It may seem obvious, but sometimes we overlook the simplest solutions.
- Next, check the audio output settings on your laptop. Go to the sound settings and ensure that the correct audio output device is selected as your default.
- Another common problem is that the audio output on your laptop might not be compatible with the audio input on your TV. In this case, you can try using a separate audio cable and connect it from the headphone jack on your laptop to the audio input on your TV.
- Lastly, ensure that the audio cables are securely connected. Sometimes, loose connections can prevent the audio from playing through the TV speakers.
Low-quality Display On Tv
If you notice that the display quality on your TV is not up to par after connecting your laptop without HDMI, follow these troubleshooting steps:
- Check the resolution settings on your laptop. Make sure that the resolution is set to match the capabilities of your TV. Adjusting the resolution can greatly improve the display quality.
- If you’re using a wireless connection or an adapter, it’s possible that the signal strength is weak, resulting in lower display quality. Try moving closer to the TV or using a different wireless channel to improve the signal.
- Ensure that the display drivers on your laptop are up to date. Outdated drivers can cause compatibility issues and affect display quality. Visit the manufacturer’s website to download and install the latest drivers.
- Finally, check the video settings on your TV. Some TVs have picture modes or settings that can enhance the display quality. Experiment with these settings to find the optimal configuration.
Laptop Not Detecting Tv
If your laptop is not detecting the TV, even though it is connected without HDMI, try these troubleshooting steps:
- Verify that the cable or wireless connection is properly connected to both the laptop and the TV. Ensure that there are no loose connections.
- Check if the laptop has a dedicated key or function (e.g., “Fn + F8”) to toggle between display modes. Pressing this key combination may help in detecting the TV as an external display.
- If you’re using a wireless connection, ensure that both your laptop and TV are on the same network and have the necessary software installed. Refer to the manufacturer’s instructions for specific setup steps.
- Restart your laptop and TV. Sometimes, a simple restart can resolve detection issues.
- If possible, try using a different cable or adapter to rule out any issues with the current setup.
Tv Not Detecting Laptop
In the event that your TV is not detecting your laptop when connected without HDMI, try these troubleshooting steps:
- Make sure that the HDMI input on your TV is selected and set to the correct source. Sometimes, TVs have multiple HDMI ports, so ensure that you’ve chosen the correct one.
- Check the HDMI output settings on your laptop. Go to the display settings and ensure that the HDMI output is enabled.
- Try using a different HDMI cable or adapter. The problem could be with the cable itself, so using a new one may help establish a proper connection.
- Restart your laptop and TV. This can help refresh the connection and resolve any temporary glitches.
- If all else fails, consult the user manual or contact the manufacturer for further assistance. They may be able to provide specific troubleshooting steps based on your laptop and TV models.
By following these troubleshooting steps, you should be able to address common issues that may arise when connecting your laptop to a TV without HDMI. Remember to double-check your settings, connections, and update any necessary drivers to ensure a seamless and enjoyable viewing experience.
Frequently Asked Questions For Connect A Laptop To Tv Without HDMI
Can I Connect My Laptop To My Tv Wirelessly?
Yes, you can connect your laptop to your TV wirelessly. One option is to use a casting app like AirBeamTV to wirelessly connect your phone to your TV. You can also use screen mirroring to connect your laptop to your TV.
Can I Connect Laptop To Tv With USB To HDMI?
Yes, you can connect your laptop to a TV with a USB to HDMI adapter. Simply plug the USB-C cable into your laptop and the HDMI cable into your TV. Then connect the other end of the HDMI cable to the adapter. Select the HDMI input on your TV and you’re connected.
How Can I Share My Screen Without HDMI?
To share your screen without HDMI, you can use a casting app like AirBeamTV. This allows you to wirelessly connect your Laptop to any popular TV and cast the content on your Laptop’s screen to your TV.
How Do I Mirror My Laptop To My Tv?
To mirror your laptop to your TV without HDMI, you can use a USB-C to HDMI adapter. Connect the USB-C cable to your laptop and an HDMI cable to your TV. Then, plug the other end of the HDMI cable into the adapter. Select the HDMI input on your TV to finish the process.
Conclusion
Connecting a laptop to a TV without HDMI is a convenient way to enjoy your favorite content on a bigger screen. With the help of alternative methods like VGA cables, wireless casting, or USB-C to HDMI adapters, you can easily establish a connection.
By following these simple steps, you can enhance your viewing experience and immerse yourself in high-quality visuals without the need for an HDMI cable. Enjoy seamless connectivity and make the most of your laptop and TV without any hassle.